Like my Facebook page!

Ravelry Rocks!

Thursday, November 19, 2015

DIY Advent Calendar!

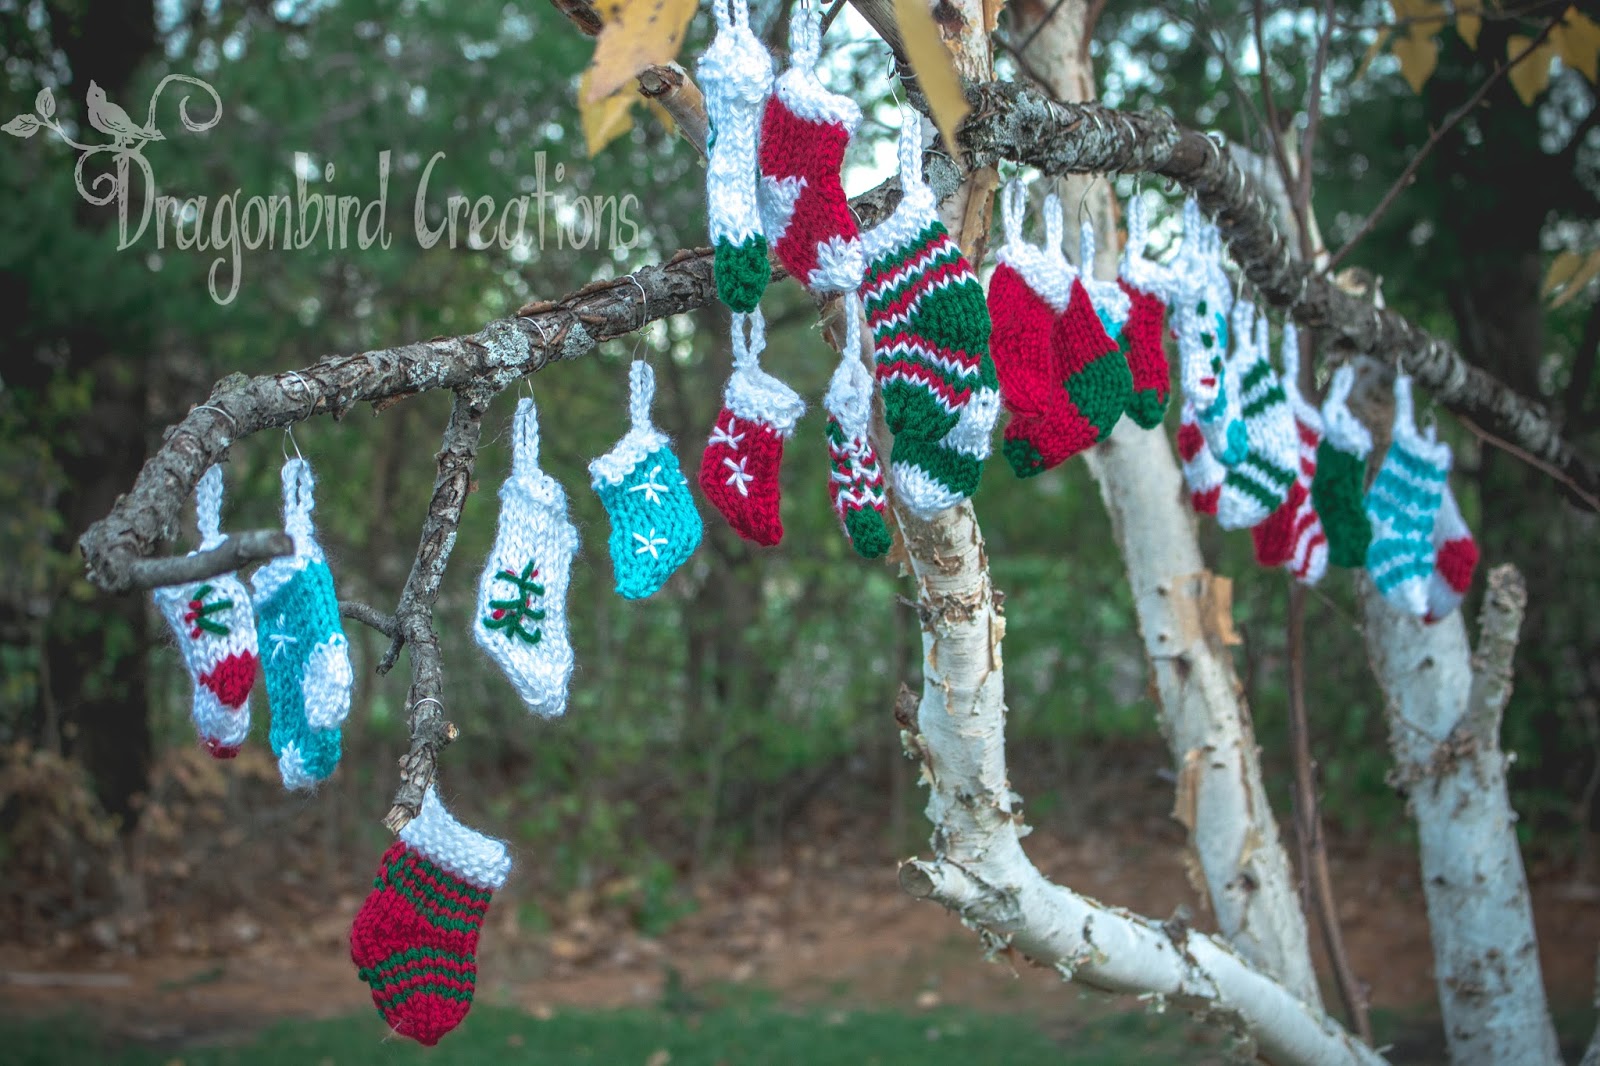
I have always wanted an advent calendar!  I thought it would be cute to knit some little stockings and hang them on a stick and use that as our advent calendar!  Inside each stocking will be two goodies and two papers with a random act of kindness (I have two kids so it works well that way).

I used this FREE superminis sock pattern to make my little socks.  I'd never knitted any socks before-so these were my first.  There is a great German rows tutorial included if you have never done that technique.  I have done it before so I didn't need it, but it is nice to have if you are a newb!  I used worsted weight, so they came out to be a pretty decent sized sock for the advent calendar.  Then I decided I wanted to get all cutsey and have some little ones too so I modified the pattern by:

CO 12

Omit the second short rows section

did my decreases on every row instead of every other row

There are loads of other free socks patterns I considered-this was just the first one I tried-and liked it so I just went with it...here are some more free patterns that I considered, I just haven't gotten around to trying them yet!


Sockknitters Mini-Sock
Toe-up Mini Sock
Mini Stocking Ornament

And for the crocheter in me:

Little Christmas Socks


Once I got finished with my 16th sock I hit a rut...I got sick of socks...so I tried my hand at some brioche...knitted a fun colorwork hat (and even a matching one for my dog)...caught up with a few orders for friends and family....and then went back to finishing all the socks so I could get to the even more fun part!


I then went hunting for a nice big stick...this was pretty easy as we live on a wooded lot and it has been really windy here! Of course, once I brought it in I realized there were a few creatures on it so now I have a few leaf hopper bugs in my house! DOH!

I took some wire-unfortunately I don't know the gauge-it was just thick enough to be easy to cut but also easy to bend into shape but not bend back with the weight of the goodies inside the socks...I wish I could be more helpful there, but my days of jewelry making are over and I've long since thrown out the little tags on the wire I have.  I originally wanted little hook things from Home Depot, but my husband seemed very uninterested in helping me at all, and I have to pick my battles.  Before you go hating on him, he's a wonderful man who does everything for his family, but works very long hours.  I have to keep my "Honey Do" list reasonable so I get the things I need to get done...done!  He still needs to tarp over my chicken run, and I have that as a priority as we are supposed to get snow on Friday!

I made little hooks by twisting the wire around the stick, leaving one end long enough to shape into a hook.  That's it!  I'll need to get hubby to actually hang this on my wall for me, but that can come after the chickens are all cozy in their covered run....and probably after I host Thanksgiving! :)


Wednesday, November 18, 2015

The Hatred Test

My good friend posted a photo of a kitty wearing a hat on my facebook yesterday...She said her dog needed one...I advised against this at all costs...Surely the dog would hate her forever if she did such a thing!  Then she told me she was only kidding...

Well...you can't tell an obsessive yarner that you think something should be made and not mean it...So I just got done making a baa-ble hat (awesome free pattern!!)  and figured I'd attempt to make my very first (and hopefully last) dog hat!  Just to test the theory that dogs do not appreciate such things....and they will hate you.....rather emphatically until the end of time...But cats...cats don't like humans anyhow so go ahead and make the wear hats!


I have to say, Lola actually didn't mind it.  She was pretty chill throughout the whole process of  taking measurements, trying it on and modeling it...

For those that want to recreate what I did....here it goes:

Click that link above to bring you to the baa-ble hat so you can follow along...

I decided that for her head size she'd need a cast on of 60...

I did K2, p2 for the ribbing-about 3/4 of an inch...
Then I did a straight k row
then I did one row of the little flowers from the baa-ble chart...

Then I came to the ear holes

k7, BO 13, k17, BO 13, k8  (in case you need a different cast on number-basically you are knitting a quarter of your hat, then binding off just a tad shy of a quarter, knitting a little more than a half then  binding off a  tad shy than a quarter and then knitting to the end)

next round: k7, CO 13, k18, CO 13, k9

Then I started the sheep (I left their little feet off because my dog has a little head and I didn't want a huge head-I planned on duplicate stitching on some feet-but don't seem to mind them footless)

Then I started decreasing after two rounds of the sky-I evenly placed 10 stitch markers then did my decrease rounds like this:

k to 2 stitches before marker, k2tog
k one round even (putting random white splotches in where I felt they looked good)

Once I was able to k2tog only in between each of the stitch markers I finished off....

Then I took a crochet hook and did some sc around the ear holes so that they wouldn't curl...giving them a nice little edge.

The verdict:  She doesn't hate me!!!  She still loves me!!  AND she has an awesome hat that matches mommy!!


Monday, November 16, 2015

White Elephant Gifts!

Every year our bunco group does a white elephant gift and every year I try to outdo myself...I don't want to just to some dumb thing..it has to be creatively dumb...The first year I did the Elf That Fell Off The Shelf-an incredibly creepy doll accompanied by an even creepier poem-complete with clown's head (perhaps the only thing creepier than a clown is a creepy elf holding a decapitated clown...

Here is the poem that accompanied him, if you choose to copy my idea and start this creepy tradition...

The Elf That Fell Off The Shelf

He once was an elfsitting upon a shelf so high
But a task from Santa went a little awry!

He was not the most graceful and did suffer a fall
And now he gives his message to all!

You better be good for goodness sake!
Because otherwise your presents-he will take!

Into your dreams he will creep
Stealing your gifts as you sleep

Hell take your chocolate when your back is turned
Hell make sure your carefully cooked dinner is burned

Youll think youve seen the last of this little pest
But youll find hes an unwelcome and permanent house guest.

Throw him away and hell just get meaner
Hell find his way home-and not any cleaner

Missing socks and tennis shoes?
You might have The Elf That Fell Off The Shelf Blues!

Teenagers giving you a nasty attitude?
Hes probably spiked their food!

Toddlers whining and in your face?
Must have an Elf That Fell Off The Shelf in your place.

How do I break this curse?  Do you say?
Well listen close, Ill tell you the way
Carefully wrap him up with care
With a new person you must share

You must be an Elf That Fell Of The Shelf Sharer
Thus spreading the joy of the seasonand the terror.


In return, I received my neighbor's son's old holey underwear...So I saved them...For a whole year...so that I could plot my revenge...

Enter Johnny's Underwear Ornaments!  

 I've already made Johnny's Underwear Snowman a pattern on Ravelry-feel free to download it for free here.

This is how I made the ornaments

With the (freshly laundered and ironed) underwear laying with two layers...I used a pinking shears to cut out some heart shapes and some star shapes.  You need two of each shape for each ornament...


 I then cut out some ribbon and stuck it between the two layers so that the ornaments would have a hanger...

Then I sewed around the ornament-about 1/4 inch from the side but left a little open so that I could stuff it...

I then lightly stuffed the ornament, just to give it some POP!


After sewing the ornament closed you have a final, unique, disgusting gift to give for your next White Elephant gift exchange! :) 


Thursday, November 5, 2015

The Struggles of a Muggle....


So, my daughter has gotten into Harry Potter...Like over the moon crazy in love with the books and movies...So I thought I would be an awesome mom and buy one of those awesome pattern collections and make her a Dobby hat....She was very upset that I would do such a thing because apparently, all Potter fans would only get depressed if they saw that hat.  Such a shame too because it is awesome....


So then I thought, SURELY she'll want a mandrake...Those things were super awesome and every Potter fan needs one of those!  Duhhh...So I made one...Um ya..she was having none of it..She did, however, get in costume and take a few photos with it just to be a good sport! :)  If you want to know how I did it, this is what I did-it isn't a true pattern though...just a recipe. :)


I'm not going to work up a whole pattern as I sort of freeform knitted it...BUT if you want to sort of follow what I did here are some random little notes:

On waste yarn provisional CO 18...Then in the round for as long as you would like your head portion-increase two stitches about every inch or so...As you are knitting in the round, randomly bind off some stitches here and there-when you get to those stitches you bound off simply pick up the same amount of stitches by using the purl bumps two rows down (that gives you the nice little wrinkle look)..

Just before you get done with the head section start increasing for the arms on either side-every other round I did an increase round as if I was working a raglan top (I gave each arm 8 stitches) then put the arm stitches on a holder and continue working in the round for the lower body, but you will start decreasing two stitches every inch or so...continuing to put your wrinkles here and there...I ended with 18 stitches so I could put 9 per leg....I worked the arms and legs in the round-decreasing as I went and then finished off with icord and then a few chains with a crochet hook...

After I undid the provincial cast on, I made the branches by making icord out of them in sections...Then I stuffed and sewed closed and then I used a crochet hook to make even more branches and leaves...

I just tied some loose yarn strands to the ends of the legs and arms and frayed the ends for the little 'root' look and embroidered on the face with some black..I had actually done colorworking as I went for the eyes and mouth in dark brown but didn't think it showed up too well so I went over it with black. :)

So there you have it...my recipe for a mandrake.


Monday, August 24, 2015

The Eggless Horseman! DIY Chicken Cowboy Costume


Do or do not...there is no try-Yoda.   I do believe he had this chicken costume in mind when he said that.


It started as something I was completely awestruck with...And then it became an obsession...And then it became an very serious plot...and then it became a very intense workout...and then it became reality.

This was a labor of love as well as super mega cheapness.  I did NOT want to spend a grand on a cool costume (the one I found online was $1500 and so fabulous).....

Be warned!!!  I AM NOT A SEWING DESIGNER.  I do design knit and crochet patterns- you can see them (and all my other random craft craziness) on my facebook page.  I do not like to sew and I consider myself a novice.  I have had no formal training-I taught myself to sew to keep my mind occupied while my hubby was deployed a while back.  Don't attempt this if you need a perfect pattern-this is merely a guide for someone who is adventurous.


You will need (always err on the side of caution and buy more if you think you will mess up or need a larger size-I am a size small and I just scraped by with what I bought):

2 yards white faux fur-do not skimp-buy the really nice grizzly long fur...
2 yards yellow flannel
1 yard white (for lining)
.25 yards of red felt
3 sheets of yellow felt
1 sheet of black felt
velcro  (you'll need just a tad more than what fits around your waist)
Elastic
Polyfil (stuffing)
plastic grocery bags (a crapload)
chicken wire
pool noodle (preferably white or a very light color)
Jelly Belly Jelly beans (or snack of choice)
Sharpie
Tissue Paper (Or whatever you want to use for a 'pattern')
Overalls that you don't mind destroying
socks and/or cowboy boots (maybe knit or crochet them or make some out of brown felt)
Yarn for reins (which I still haven't made)

To begin, I sketched my ideal chicken shape onto paper to use as a guide.  Then I laid out some tissue paper (to use as a pattern-I had to tape a few sheets together) and used a sharpie to draw my chicken's body shape (be careful because sharpie will BLEED THROUGH TISSUE PAPER so put newspaper underneath or do this outside)


 I then cut out my chicken's body shape-I  made sure it would work for the size chicken I would need by holding it up to myself and making sure that back portion would be enough to go half way around my waist.  At this point, you  may need to make your chicken bigger or smaller depending on your size...


At this point you will be stressing out because you will be needing to cut into that expensive material.  Pour yourself a nice bowl of jelly bellies....or chocolate...just not alcohol.  You will be using sharp objects! haha!  

Using my chicken's body pattern I cut two pieces of my faux fur material (your fur should be folded or laid so that when you cut it you will have two mirror image shapes-I kept the wrong sides together as I cut).

I then cut two wedge shapes-one for the back of the head and one for the belly of the chicken-each were cut with the fold at the bottom so when you open them they are like a pointed oval shape.  Unfortunately I don't have a photo of the head wedge but this is the belly wedge, but I basically just wanted to add a little depth to the head and also the belly.  


I then sewed my chicken body together, strategically placing my wedges where I thought they would help give a little extra depth...Sew them with the right sides of fabric together and then turn right side out.

 Using my red felt, I drew a comb, using the sharpie and then cut it out (in the same manner as the chicken's body-you need two pieces to sew together). 

 I then sewed my little chicken comb together and turned it right side out.  I lightly stuffed my comb and then I pinned the comb to the center of the head and hand sewed the comb to the head.
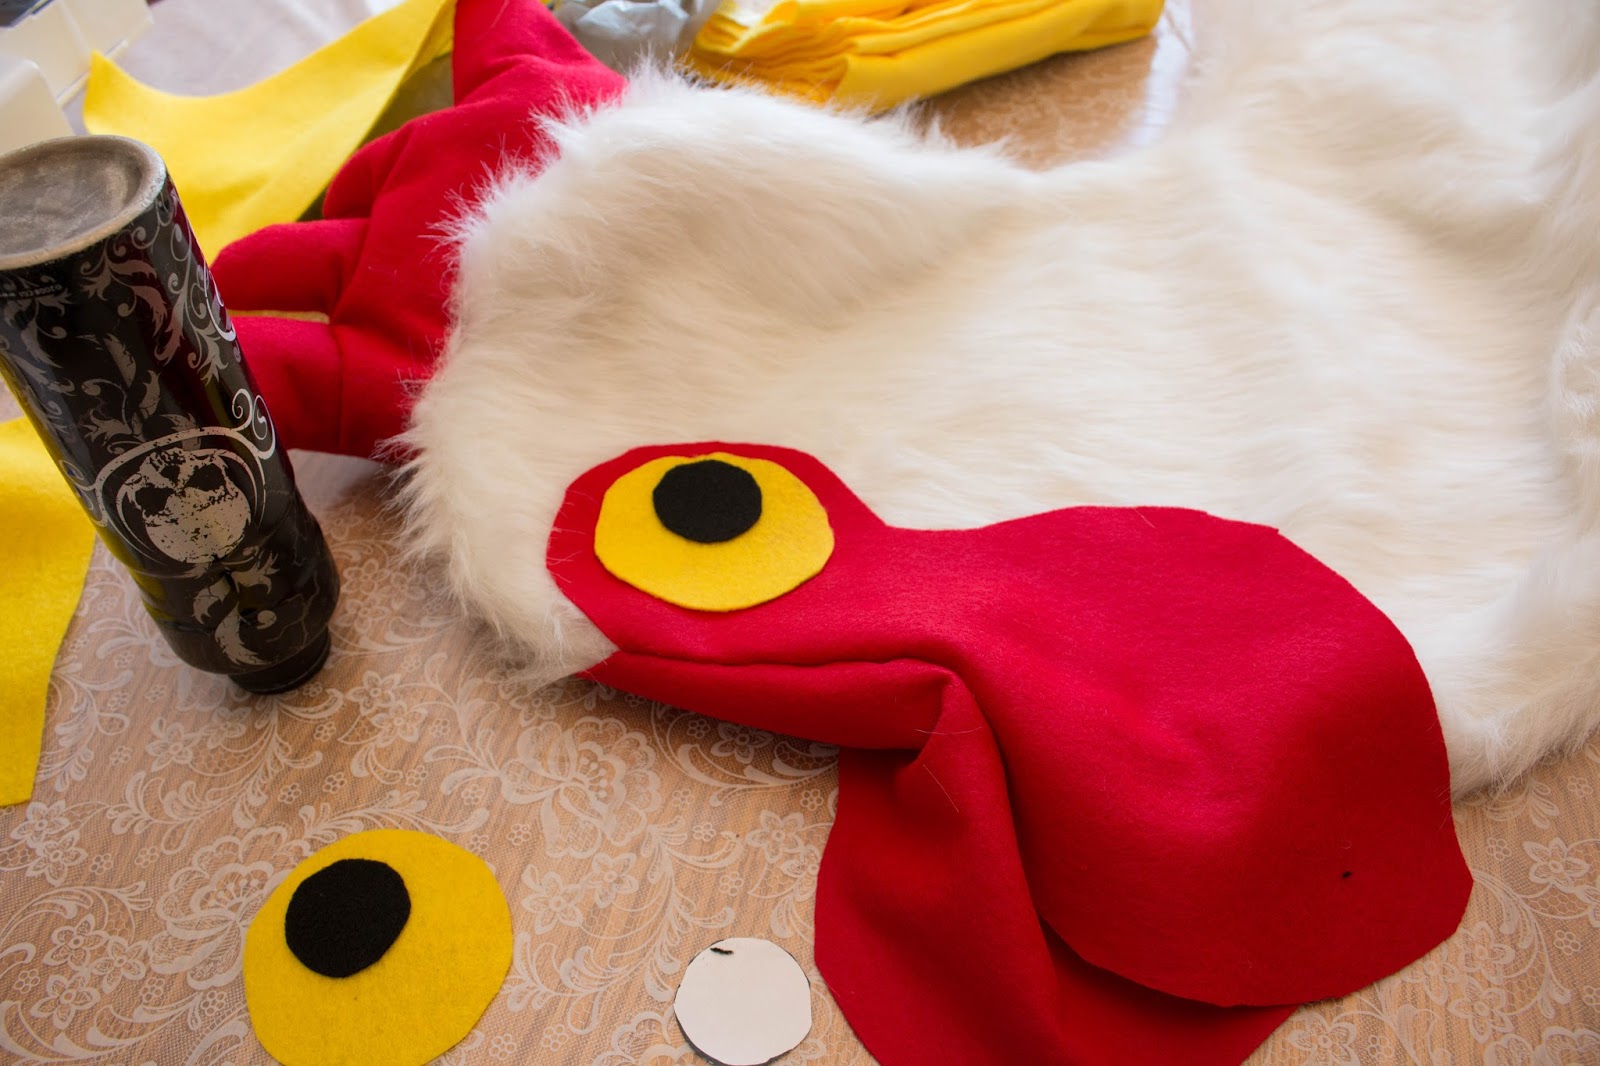
 Using my yellow felt and a cup I thought was a good size for a chicken's eye I used my sharpie to draw a circle and then cut out my eye.
 I had to use a smaller cup for the black-and since black sharpie doesn't' show up on black felt I had to make a pattern by drawing it onto a piece of paper first.
I then hand sewed all my little eye bits together and then made the waddles...Which I also forgot to take a photo of-SORRY!  I did put my eye ball on the red felt though, and outlined what I thought was a good waddle shape onto the felt and cut out two-one for each side.  The eye bits then got hand sewn onto the waddles and the waddles got hand sewn onto the face.


For the beak I drew a beak shape onto the yellow felt-for this I used the fold of the felt as the top portion of the beak so I wouldn't have a seam on the top of the beak-I then used the machine to sew the front and bottom of beak-leaving the back of the beak open to lightly stuff and then hand sew onto the face. 


At this point I was rejoicing because I could tell my chicken was going to actually look like a chicken.  Of course I tried it on and got all excited.


Now was time for the destruction of perfectly good overalls.  I actually purchased these for 40% off at Target-they were wonderful overalls so I tried really hard to rip the seams nicely so I could sew them back up if I wanted to actually use these again for real.  You need to rip out the whole crotch area so your legs can fit out the opening and you can pull them up over your waist with the legs dangling at your sides.  I then just used socks for at the bottom of the pant legs...I used safety pins to keep them on-I just didn't want to sew into these jeans.  I stuffed the socks and the legs of the pants with grocery bags loosely.  I had contemplated newspaper, but it is always rainy on Halloween so I figured grocery bags won't get all soggy.

 I decided I needed a lining for the chicken's body that my body will go through-I just used my white material and made a tube that would be large enough to fit around my waist with a little extra room and then made a big hem on the top so I could put some elastic through it.  Instead of completely closing my chicken up, I wanted to be able to access his innards so I used velcro to keep the lining attached to the body.

I don't have a good photo of the innards of my chicken because I had to build it while it was inside the chicken.  I felt like a surgeon.  I put the pool noodle in the bottom of the chicken and that is my base-I put both the ends together and used duct tape and some strange wire things hubby gave me to keep it still.  I used chicken wire and made a long tube that went from the base to the top of the head and attached it to the pool noodle. I did the same thing for the tail.  

The chicken wire was a really good decision because it doesn't add a lot of weight and then you only have to stuff a little bit around the wire....


For the chicken legs I just used some old pants I have and traced the outline of them onto the yellow flannel and cut out two of those...seamed up the inner legs and then sewed the body together...
 I then used tissue paper to make a chicken foot pattern, sort of using my own foot as a template.


Each chicken foot needs two pieces of felt cut with right sides together ....then sew the outer edge of the foot seams-leave a portion open though so you can turn it right side out and then stuff.  You'll then sew closed your hole...After it is stuffed you can sew closed the inner foot part.

 I didn't really like how the foot hangs on me, so I am going to be putting a velcro closure on the back of the feet so I can keep them in place..I am also going to be putting elastic across the bottom so it will hug my shoe.

Now you need to immediately put your chicken cowboy costume on and go scare your girls! :) 


Monday, August 10, 2015

Turning 40: Cause for Deep Inner Reflection....and knitting!


I don’t mind being 40.  Truth of the matter is that I never even remember how old I am most of the time because, frankly, I don’t care.  Back when I was 32 I was deep in thought how I was ‘almost 40.’  I thought about it so hard that I actually thought I WAS 40.  At the doctor’s office, he asked how old I was, when I told him I was 40 he gave me a math lesson.  I lost 8 years that day.  I didn’t feel any different.  I was the same me I was leaving the office as I was coming in. 

I don’t mind being 40 because I almost wasn’t 21.  A lucky break with a cheap in-school physical alerted us to the fact that I’d need heart surgery if I wanted to make it to 21.  So really, I guess every breath I take after that birthday is just a heaven sent gift that some random stranger with a stethoscope decided to not let me pass a physical-first test I ever failed!

I don’t mind being 40 because I spent so much of my childhood wishing I was dead that I feel that I need to be thankful to my inner strength for getting me this far.  I can’t thank myself by wishing for something that cannot be.  I can thank myself by being grateful for every single thing I have.

I don’t mind that being 40 means I actually have to work out a lot harder than I did when I was younger to fit into my pants.  Sure, it is a little more work-but with more work comes great pride and self-respect and those two things are priceless.  No matter how much I work out, my legs will never be as nice as they were when I was 20-I’m OK with that…because I am sure they look better now than they will when I am 102!

I don’t mind that being 40 means I have to actually pluck disgusting hairs on my upper lip.  Totally gross.  I’m horrified that nature does this to us.  It’s just something I have to do now, and it is annoying as all hell, but in the grand scheme of things, it really isn’t high on the list of things that will destroy your life.

I’m so glad that I am 40-I have learned so many things over the years-things that I would have killed to know back when I was 20….
  •     A sports bra is the most comfortable item of clothing-and it actually looks good underneath clothes!
  •     The color nude, although hideous, is an imperative color of bra if you wish to wear a light top and not have your bra show through!
  •         It is nearly impossible to be unhappy when you wear flowers in your hair!
  •     Cigarettes do not make you happy-they make you wrinkly and old.
  •       No matter how bad you think you have it, there is always someone that has it worse-so smile for what you have today because it could be gone tomorrow.
  •     Chickens.  Yes, that is a full statement.  Any ‘why’ question can be answered with:  Because chickens.
  •     Wearing a stupid hat on your head can mean the difference between a life of boredom and a life of giggles.
  •      It's OK to compete with yourself.  I try to one-up myself every chance I get.  I try to knit something better than I did yesterday and I try to make a better Halloween costume every year.  If you can't be your best competition-what's the point?


I can’t wait to find out what I will have learned by the time I am 80!

Saturday, July 4, 2015

Yarn Dyeing-You Need To Have The Guts!

I have always wanted to try my hand at dyeing yarn. I've always been really scared to try though. Working on my alien dissection's internal organs, I decided to go for it and use the Wilton cake frosting dye method-I am so glad I finally have the guts to try it! BAHAHAHA!


This is still a work in progress, but I was so thrilled with how my  yarn dyed up I thought I'd share it with ya'll!  Since my little yarn blobs were small I just used some berry bowls and put in a small amount of water (enough so my yarn blobs could have a cozy bath), a dash of vinegar and a tiny amount of Wilton Cake Frosting Dye-I stirred it around with a toothpick until I was happy with the color concentration.  

You need to keep the water hot-but not boiling-so I used my microwave.  I wasn't about to have pots on the stove or anything funky like that-so I just kept nuking them for about 15 seconds every few minutes just to keep them hot.  I would stir them gently as well.  I just kept soaking them until I was happy with how they looked and then rinsed them well.

Here is what the guts look like hanging out to dry...In case you wondered what alien guts look like hanging from trees...


I'm really happy with my little alien so far-I still have a few more guts to make and then get it all put together, but he is going to be awesome-at least he will be in my mind. :)  I can't wait to share with you the finished object! :)

Here he is off the needles, a few days later
Every once in a while, a project will come along that you become obsessed with. I'd am happy to admit that this Alien Dissection has been one of those projects. This little guy has been building up in my mind for such a long time...I am so excited that he is finally off the needles. I love how his hand dyed guts turned out-I can't wait to dye again...All this guy needs is a nice little shadowbox, fun little background and some T-pins!

A few days later....He is DONE!  I love him.  I am so proud of myself....mainly because I have convinced hubby to hang him on my wall-I thought, for sure, he would put his foot down!  EEK!  Mr. Alien shall hang on my wall with my Star Wars snowflakes that I lovingly cut out a few years ago and hung in sweet frames.