Like my Facebook page!

Ravelry Rocks!

Thursday, January 7, 2016

Waking Up To Watercolors

A strange thing happened the other day...I woke up and felt the need to watercolor a chicken.  I love painting-I love painting on faces and making murals for walls, but I have never ever used watercolors before.  I did,  however, purchase supplies a few months ago thinking I'd like to try it, but then after reading up on it got too scared and just put them in a cabinet.

I awoke with a focus and drive I've never experienced before-a huge calling to me to try watercolors..  Totally bazaar, but I went with it...And then this happened...


And then this happened....


Then I painted the photo you see at the very top of the page-my favorite one as of now!  Then I had a request for  cardinal as they remind my friend of her late mother....and this happened!  I wanted to evoke the feeling of joy, hope and energy...I hope I captured that...this was my practice piece and I'll get some better paper in a few days and do a real one...


I am glad I went with my wake up feelings that day....this has given me a great feeling of accomplishment...I know I have a lot to improve, but I'm focused on the future and learning more!  I was never allowed to take an art class in High School-I had to fill my schedule with honors classes and foreign language...all great to know, but I always had wanted to take an art class...maybe, just maybe, if I'd been allowed to do it I'd have found a purpose to my life-I spent so many years wandering and confused, not sure of what I wanted out of life (besides being a mom)...


Sunday, December 27, 2015

40 ROCKS!


So, for my 40th birdday I got some money-and of COURSE I wanted to spend some on YARN!  I've been wanting to make this sweater for the longest time, and decided the time has come.

I don't like necks that touch my neck though-I'm very very particular about that-I get a feeling of being strangled...so of course I was stressing over how to modify the pattern to avoid that entirely.  Many awesome Ravelers came to my aid and offered up some advice and I'm going to be implementing some short rows in the back between the colorworked sections...

Whilst waiting for my yarn to arrive I played with different color combinations-using photoshop to help my eyes get their thirst for a visual quenched...I'm happy with the combo I have picked and now for the fun stuff!  THE KNITTING!


My poor postman must think I'm insane.  He is so sweet to run all the way down my driveway to bring me packages-he actually waits for me to answer (not like that stinky UPS guy who just chcuks stuff at the door and all I see of him as I open the door is his backside jumping back into the truck).  I saw that box and just about lost it yesterday!  I do believe I even jumped up and down...may have screamed a bit too!

The next day:  I finished up the ribbing, colorwork and a bit more-I stressed about my gauge a little-I thought I was spot on at first but then realized it was getting 16 stitches instead of 18 for every 10cm...but I'm not going to sweat it.  I wanted this sweater to be a little roomy and I chose a small-I normally like a medium when I want roomy-so I'm going with it.  It looks lovely!  The yarn is scratchy-but not nearly as scratchy as I thought it would be!

12-22-15:  Merry almost Christmas!! In between making oodles of Christmas cookies, finishing some last minute gifts, wrapping all the presents (haven't yet broken my vow to always wrap as soon as I bring the gift home), a few little trips to the post office, I have managed to make a good deal of progress on my sweater. I have taken a few hours of the last few days to watch a movie each day with my daughter (The Hobbit movies-we always do a LOTR marathon on New Year's Eve, so we wanted to get ready) so I pounded out quite a bit watching the hobbits and dwarfs hunting down Smaug...Now I'm wondering why the plural of dwarf is dwarfs and not dwarves?

My modifications to this pattern are below...Please refer to the actual Afmaeli pattern, as I am only posting my notes on how I modified it slightly to accommodate for my neck issues... Please note that the ds refers to a double stitch as for German Short Rows-you can easily wrap and turn instead if you prefer. 

I use a 3.5 needle throughout-I tend to knit looser and it wound up working well for me that way...

During the yoke portion I used some short rows in this manner:

for round 1:  K80 (I made an adult small-you will have a different count on a different size-I think I was about five stitches from the center) PM, turn, ds, p 224 PM, turn, ds, k to beginning.

then I skipped row 4 and continued with round 5, kept going until round 15...
round 15, k to 3 stitches before SM, turn, ds, p to 3 stitches before SM, turn, ds, k to beginning and then go to round 18...

keep going until you reach round 31-k to 8 stitches before SM, turn, ds, p to 8 stitches before SM, turn, ds, k to end and start with round 33.

Row 42: k to 11 stitches before SM,turn, ds, p to 11 stitches before SM, turn, ds, k to end and then start with round 44.

for the neckband I omitted all of the decreases that it tells you to do.  I only did 3 cm of ribbing.  Also, I switched up the coloring-I wanted to see more of that lovely blue so I made sure I chose blue for the larger portion of the color chart-I also added one round of all black to give it a finished look before starting on the ribbed portion-SO happy with it!


Saturday, December 12, 2015

Winner Winner Chicken Dinner!


I made this Rooster Hat Pattern a while back and never got around to actually making a hat for myself.  I wound up donating the last one I had after all the testing was over (it wound up getting $90 in a silent auction-which is CRAZY to me-but I was thrilled to hear that).

I had dreamed of having chickens ever since we moved to our new home.  My hubby really wasn't into the whole chicken thing, so it really took 4 years of convincing and foot dragging (on hubby's part) with the construction of the coop being in a state of construction for about a year and a half.

I am officially in love with my girls now, we've had them since the day before Easter and I haven't had to purchase eggs since July!  Very exciting!  I belong to a few chicken groups on facebook and I offered up a chicken hat to the winner of a little contest we have every month...Well, I got all excited about making one and decided to make one for an administrator who does so much for the group and one more for MYSELF!  EEEHAWWWW!!!

I love my chicken hat-although not half as much as I love my chickens!  :)  Next spring I plan on adding to my flock...I want to have a total of 12-20 hens and one rooster...I plan on buying a straight run so I have to plan for 50% being roosters...but then I have crappy luck, and you have to consider some may not hatch....so I should take that into account as well...so I will most likely be getting 50ish fertilized eggs.. CHICKEN MATH!!!  I plan on being able to raise my own chicks from my flock and butchering them for eating when I have more chicks than I need...I won't name those of course.


Wednesday, December 2, 2015

Easy Brioche Panel


I fell in love instantly when I saw the Stockholm Scarf (free pattern by KnittedblissJC)..I knew instantly that I had to make it-but then I also knew that I didn't have enough of any one color.  Plus, I really like to mess around with things...can't just do things the easy way, ya know?

So....I fiddle farted around a bit and wound up with this fun little infinity scarf!

I followed the first panel (the dark grey) as written...

Instead of making another panel the same way, this is where I started getting a little creative.

For each of the tan and pink panel I used a cast on of 37  (multiples of 5 plus 2) and then followed the pattern for the same amount of repeats as I used for the long panel.

For the brioche portion, I warn you-I am a brioche novice-I've never written up a brioche pattern and I just sort of fudged what I was doing...If you look at my panels there are a few strategically placed decreases and increases-those are not included in this little pattern as I just snuck them in here and there as I felt I wanted them...But here is the brioche panel for straight lines (it is up to you to add decreases and increases if you feel you need them also).

In my version of this brioche panel, please note that I switched my CC to a different color about halfway through...just cuz I felt like it (and I was running out of pink).

CO an even number.

SETUP:
1.  With MC, p1, *slyo, p1, repeat from * to the last stitch, sl-SLIDE work to the other end of the needle
2.  With CC:  sl, *brk, sly; repeat from * across-TURN work.

Body
1a.  With MC, sl, brk, *slyo, brk; repeat from * across until the last two stitches, slyo, k-SLIDE work to the other end of the needle.
1b.  With CC, P, slyo, *brp, sly; repeat from * across until the last 2 stitches, brp, sl-TURN work.

2a.  With MC, p1, *slyo, brp; repeat from * across until the last stitch, sl-SLIDE work tot he other end of the needl.
2b.  With CC, sl, *brk, slyo; repeat from * across until the last stitch, k-TURN

repeat 1-2 until the piece measures the desired height and then BO loosely.


Friday, November 20, 2015

Dumpster of Life (or Death)

Every year I try to get ornaments that have significance in our past year...Last year, if you were paying attention, you would have seen the podiatrist shrunken head and ingrown toenail ornaments I made for my son....

This year, I decided I needed a Glenn Dumpster...Now, of course I made it as an ornament, but it would make a great gift box for any Walking Dead fan...Or just a fun little table doodad...you could put some zombie guts in it or something...or candy...ya...candy!!!

Anyhow, here is how you make this little gem

With worsted weight yarn I recommend 100% wool-I didn't have wool, I used acrylic, but it isn't as structured as it could be if you used wool...
US 3 (or any sized needle that will give you very tight gauge)

Very small amounts of white, brown, grey, yellow and dark blue.

Base
with dark blue CO 15
Work 10 rows of stockinette (starting with a knit row)
BO

Long sides (make two)
with dark blue CO 15
k 3 rows
work in stockinette for 7 more rows starting with a purl row
BO

Short Sides (make two)
with dark blue CO 7
k 3 rows
work in stockinette for 7 more rows starting with a purl row
BO

Lid
With grey, co 22
(k1tbl, p1) across for 12 rows

The garter edges are the tops of your sides-so keep that in mind for the embroidery:
 using your yellow and grey and looking at photo for the details, use duplicate stitch embroidery to make the little yellow sign and the grey thinamathing....


White bag
with white, pick up 3 stitches from the top of the front long side
1.  kfb, k, kfb
2.  k2, k2tog, kfb
3. BO2, k2tog
4.  k2tog and finish off

Cardboard box
with brown, pick up 3 stitches from the top of the front long side
k 3 rows
BO

Chain

separate strands from your brown yarn.  Using one strand chain loosely, until your chain is the desired lenght.

Whip stitch the side seams-only sew the lid on the very back long seam.
Update:  I've finally gotten my Christmas Tree up and I am happy to report that Glenn's Dumpster was the first ornament on the tree!  If you listen closely, you can hear Sebastion singing softly to Glenn, "Unda Da Dumpsta!"


Thursday, November 19, 2015

DIY Advent Calendar!

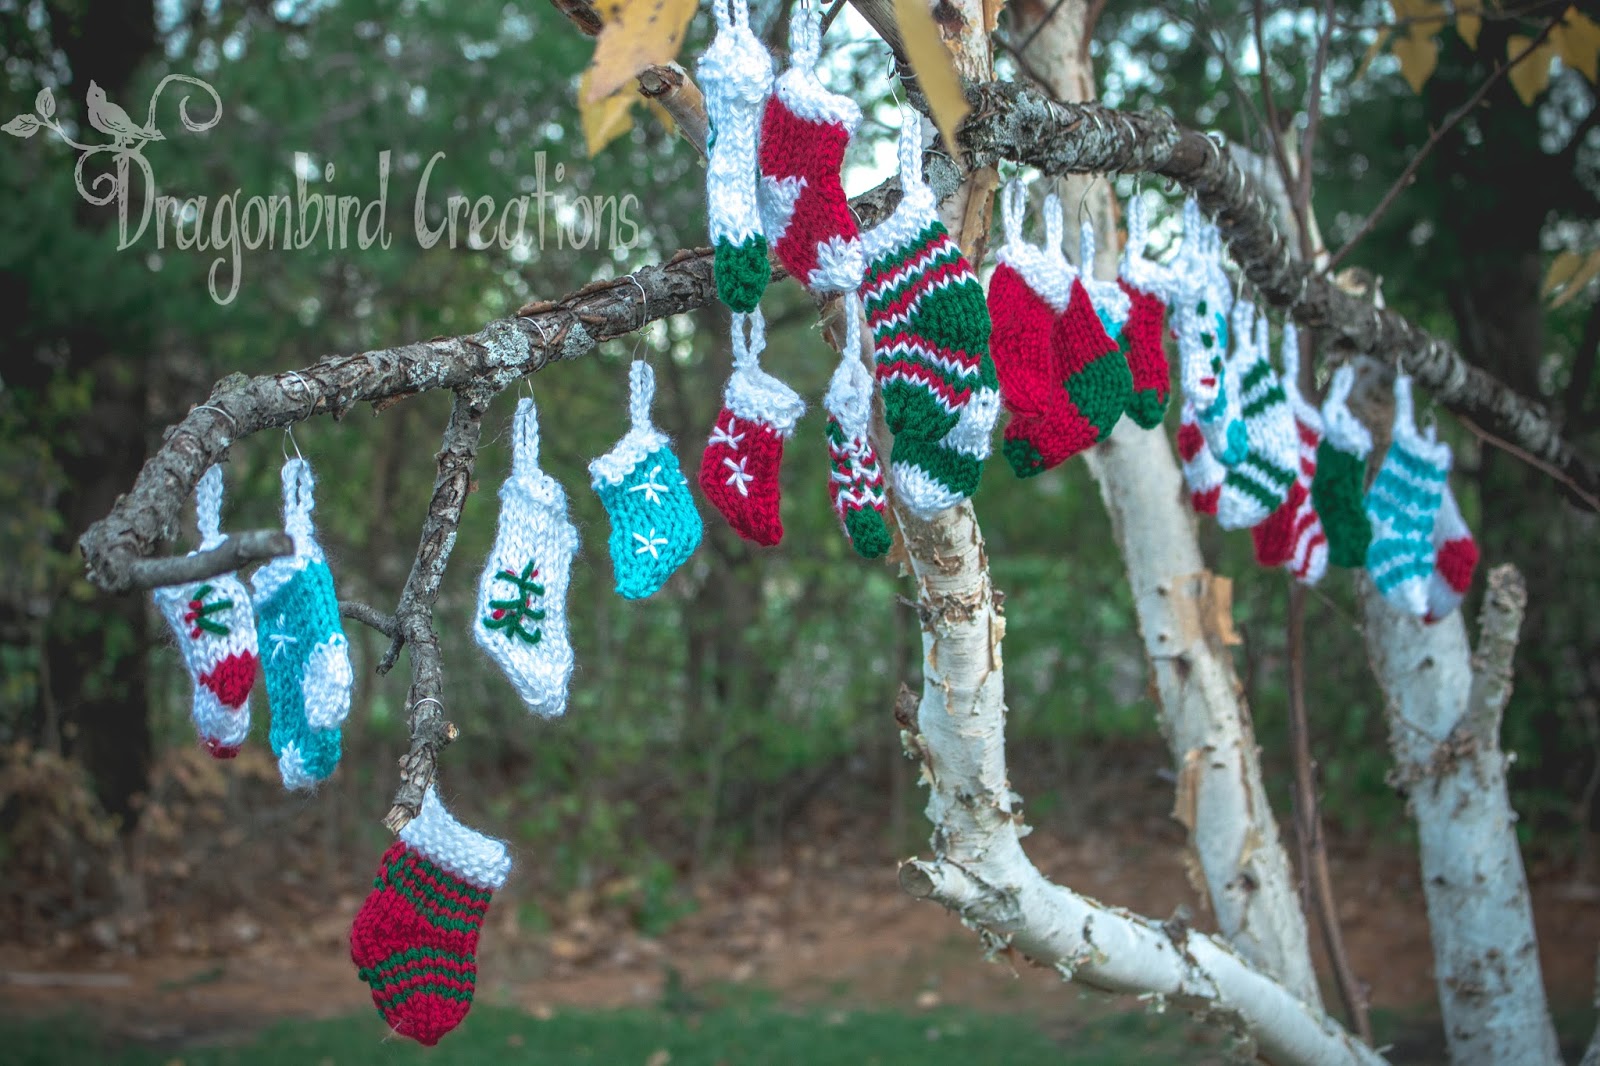
I have always wanted an advent calendar!  I thought it would be cute to knit some little stockings and hang them on a stick and use that as our advent calendar!  Inside each stocking will be two goodies and two papers with a random act of kindness (I have two kids so it works well that way).

I used this FREE superminis sock pattern to make my little socks.  I'd never knitted any socks before-so these were my first.  There is a great German rows tutorial included if you have never done that technique.  I have done it before so I didn't need it, but it is nice to have if you are a newb!  I used worsted weight, so they came out to be a pretty decent sized sock for the advent calendar.  Then I decided I wanted to get all cutsey and have some little ones too so I modified the pattern by:

CO 12

Omit the second short rows section

did my decreases on every row instead of every other row

There are loads of other free socks patterns I considered-this was just the first one I tried-and liked it so I just went with it...here are some more free patterns that I considered, I just haven't gotten around to trying them yet!


Sockknitters Mini-Sock
Toe-up Mini Sock
Mini Stocking Ornament

And for the crocheter in me:

Little Christmas Socks


Once I got finished with my 16th sock I hit a rut...I got sick of socks...so I tried my hand at some brioche...knitted a fun colorwork hat (and even a matching one for my dog)...caught up with a few orders for friends and family....and then went back to finishing all the socks so I could get to the even more fun part!


I then went hunting for a nice big stick...this was pretty easy as we live on a wooded lot and it has been really windy here! Of course, once I brought it in I realized there were a few creatures on it so now I have a few leaf hopper bugs in my house! DOH!

I took some wire-unfortunately I don't know the gauge-it was just thick enough to be easy to cut but also easy to bend into shape but not bend back with the weight of the goodies inside the socks...I wish I could be more helpful there, but my days of jewelry making are over and I've long since thrown out the little tags on the wire I have.  I originally wanted little hook things from Home Depot, but my husband seemed very uninterested in helping me at all, and I have to pick my battles.  Before you go hating on him, he's a wonderful man who does everything for his family, but works very long hours.  I have to keep my "Honey Do" list reasonable so I get the things I need to get done...done!  He still needs to tarp over my chicken run, and I have that as a priority as we are supposed to get snow on Friday!

I made little hooks by twisting the wire around the stick, leaving one end long enough to shape into a hook.  That's it!  I'll need to get hubby to actually hang this on my wall for me, but that can come after the chickens are all cozy in their covered run....and probably after I host Thanksgiving! :)


Wednesday, November 18, 2015

The Hatred Test

My good friend posted a photo of a kitty wearing a hat on my facebook yesterday...She said her dog needed one...I advised against this at all costs...Surely the dog would hate her forever if she did such a thing!  Then she told me she was only kidding...

Well...you can't tell an obsessive yarner that you think something should be made and not mean it...So I just got done making a baa-ble hat (awesome free pattern!!)  and figured I'd attempt to make my very first (and hopefully last) dog hat!  Just to test the theory that dogs do not appreciate such things....and they will hate you.....rather emphatically until the end of time...But cats...cats don't like humans anyhow so go ahead and make the wear hats!


I have to say, Lola actually didn't mind it.  She was pretty chill throughout the whole process of  taking measurements, trying it on and modeling it...

For those that want to recreate what I did....here it goes:

Click that link above to bring you to the baa-ble hat so you can follow along...

I decided that for her head size she'd need a cast on of 60...

I did K2, p2 for the ribbing-about 3/4 of an inch...
Then I did a straight k row
then I did one row of the little flowers from the baa-ble chart...

Then I came to the ear holes

k7, BO 13, k17, BO 13, k8  (in case you need a different cast on number-basically you are knitting a quarter of your hat, then binding off just a tad shy of a quarter, knitting a little more than a half then  binding off a  tad shy than a quarter and then knitting to the end)

next round: k7, CO 13, k18, CO 13, k9

Then I started the sheep (I left their little feet off because my dog has a little head and I didn't want a huge head-I planned on duplicate stitching on some feet-but don't seem to mind them footless)

Then I started decreasing after two rounds of the sky-I evenly placed 10 stitch markers then did my decrease rounds like this:

k to 2 stitches before marker, k2tog
k one round even (putting random white splotches in where I felt they looked good)

Once I was able to k2tog only in between each of the stitch markers I finished off....

Then I took a crochet hook and did some sc around the ear holes so that they wouldn't curl...giving them a nice little edge.

The verdict:  She doesn't hate me!!!  She still loves me!!  AND she has an awesome hat that matches mommy!!